
 Pin it
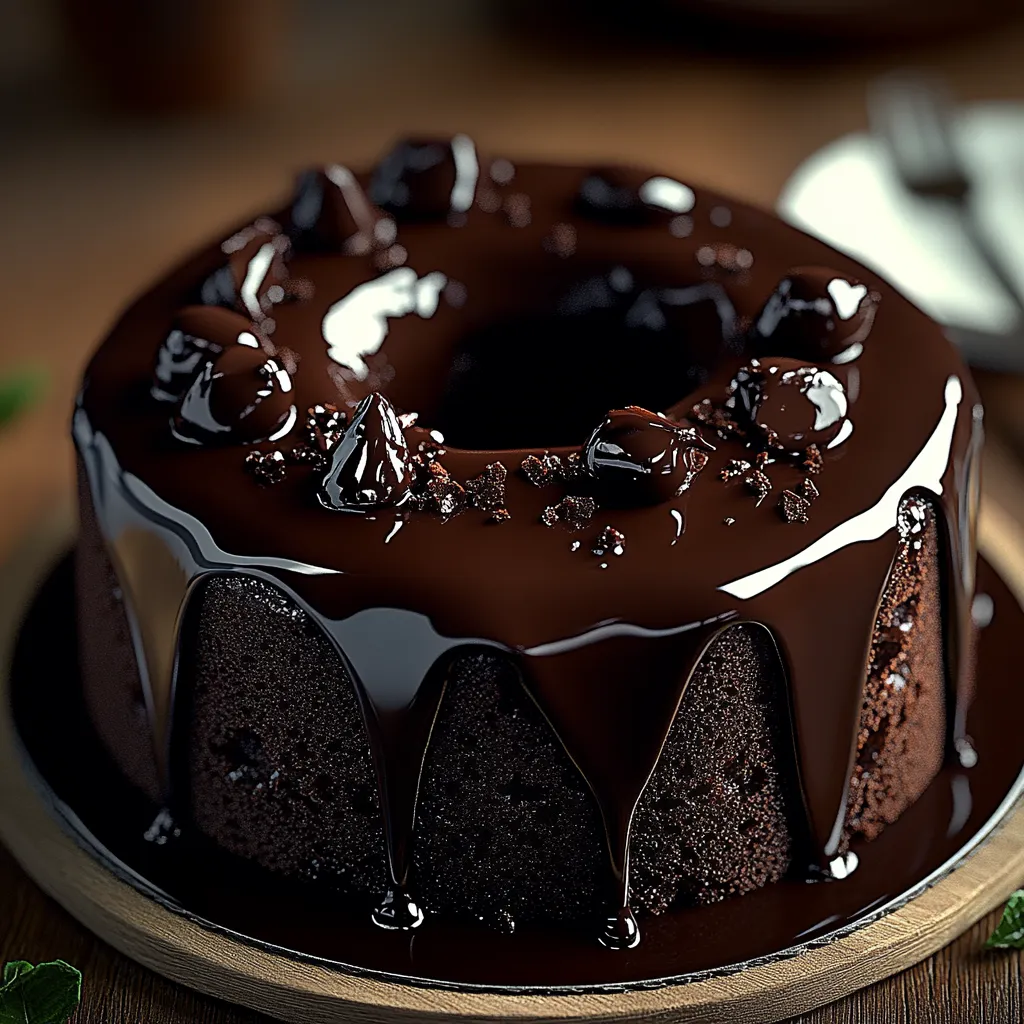
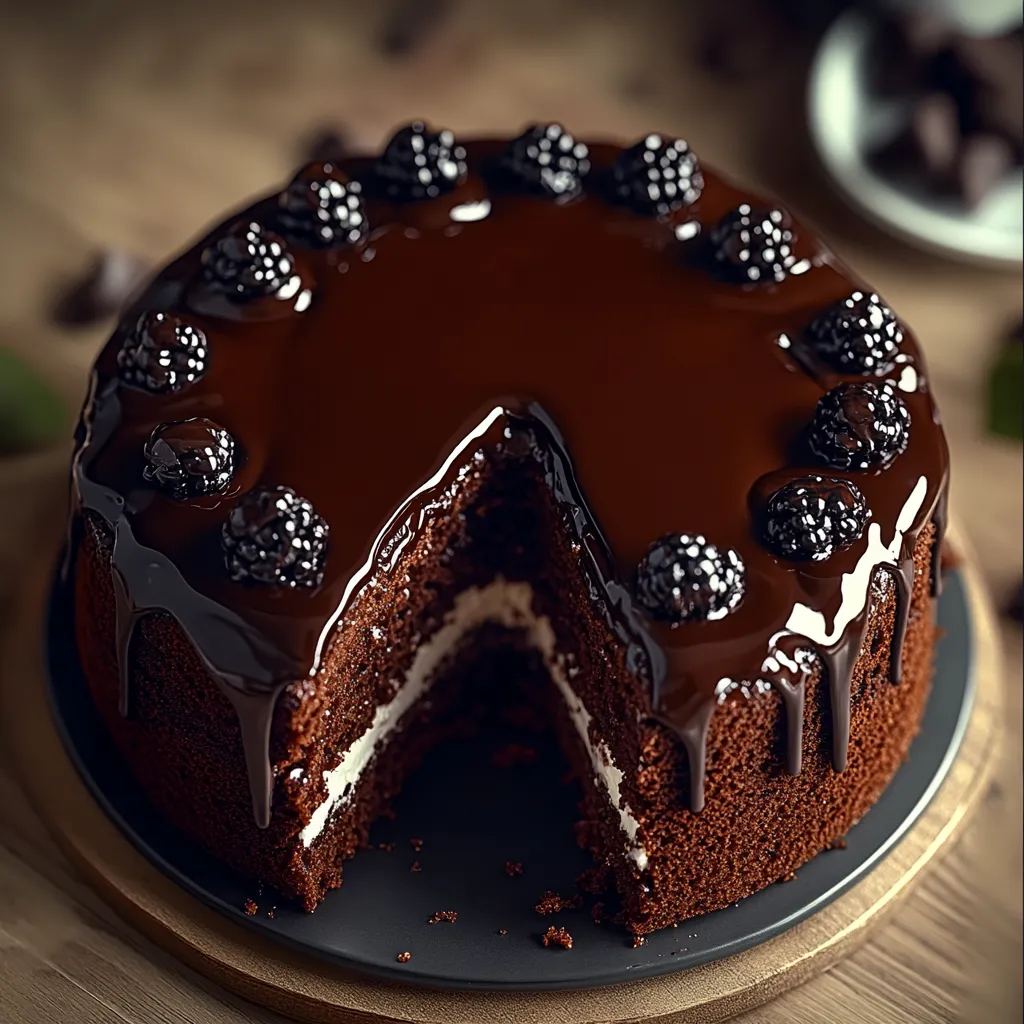
This Nestlé Toll House Death by Chocolate Cake delivers a powerful chocolate hit with every bite. The combo of cocoa powder and chocolate chips creates flavor waves that intensify as you eat. Buttermilk keeps everything super moist and adds a subtle tang that balances the sweetness perfectly. Finish it with velvety chocolate frosting and you've got the ultimate chocolate treat that'll satisfy even the most intense cravings, yet it's surprisingly simple to make.
I first made this cake for my husband's birthday after finding out he was obsessed with chocolate when he was young. His expression after tasting it told me everything—this would become our go-to dessert. Now our children request it for their birthdays too, claiming no other chocolate cake satisfies them the same way. We've discovered that even people who normally skip desserts can't resist asking for seconds.
Key Ingredients
- Chocolate Chips: Create pockets of melty goodness and enhance texture. Nestlé Toll House Semi-Sweet ones blend in perfectly with just the right flavor.
- Cocoa Powder: Delivers that intense chocolate foundation. Try Dutch-processed for a richer color and more mellow taste.
- Butter: Provides depth and structure. Use unsalted at room temperature for best mixing results.
- Buttermilk: Creates incredible softness with a slight zing. Go for full-fat to maximize moisture and flavor.
- Vanilla Extract: Enhances the chocolate notes with its sweet aroma. Don't use imitation—pure extract makes a big difference.
Baking Method
- Preparing your workspace
- Preheat your oven to 350°F right away. Cover your pan with grease, then coat with cocoa powder instead of flour to keep the chocolate theme going. Measure everything before you start mixing.
- Creating the chocolate foundation
- Combine flour, cocoa powder, baking soda, and salt in a bowl until fully blended. This ensures even chocolate flavor and proper rising throughout your cake.
- Developing the core taste
- Cream butter and sugar with an electric mixer until it's pale and airy. This adds volume for better texture. Drop in eggs one at a time, mixing thoroughly between each. Add vanilla and blend until smooth.
- Combining the elements
- Alternate the dry mixture and buttermilk, beginning and finishing with dry ingredients. Mix just enough after each addition to avoid toughness. Stir in chocolate chips carefully so they spread evenly without losing air in your batter.
- Perfecting the baking process
- Transfer batter to your pan and level the surface. Bake on the middle shelf until a toothpick shows some damp crumbs but no wet batter. Cool in the pan for ten minutes, then move to a wire rack to finish cooling before frosting.
 Pin it
My family loves this cake slightly warm with a scoop of vanilla ice cream—the temperature contrast really brings out the chocolate flavor. My daughter always asks for extra chocolate chips between layers, saying they're like hidden gems in every slice. We've learned that serving thin pieces alongside fresh berries lets everyone enjoy the rich flavor without overwhelming those who don't crave super sweet desserts.
Temperature Control
Getting this cake just right depends a lot on temperature management throughout the process. Room temperature butter properly whips with sugar, building the foundation you need, while eggs at the same warmth incorporate smoothly without separating. During baking, a consistent oven temperature helps your cake rise perfectly without peaks or dips. The cooling matters too—your cake must set fully before frosting. When serving, try warming slices slightly to soften those chocolate chips while maintaining the cake's structure.
Serving Style
Make this fantastic chocolate cake even more impressive with a few easy additions. Give it that bakery-quality look by adding a decorative frosting border around the edges. For special celebrations, arrange fresh raspberries in a ring on top for a beautiful color contrast against the dark chocolate. Try a light dusting of cocoa powder right before serving for that extra wow, or add chocolate shavings made with a vegetable peeler for dimension and visual appeal.
Flavor Twists
Start with this chocolate base and transform it into new taste experiences while keeping that intense chocolate impact. Create a coffee version by adding two tablespoons of instant espresso powder to your dry mix—it actually boosts the chocolate flavor. When autumn rolls around, mix in cinnamon and a pinch of cayenne for a Mexican hot chocolate feel. For fancy occasions, fold in some orange zest and swap part of the vanilla for Grand Marnier, creating a grown-up chocolate-orange combo that builds on the original's strengths.
Keeping It Fresh
Enjoy your cake beyond the first day by storing it properly and letting those chocolate flavors develop over time. Store at room temperature in a cake dome or airtight container—you'll notice the taste actually gets better after a day as everything blends together. For longer storage, wrap individual slices in plastic and foil before freezing for up to three months. When ready to enjoy frozen pieces, thaw in the fridge overnight, then warm slightly to revive that fresh-baked quality.
 Pin it
This Nestlé Toll House Death by Chocolate Cake truly deserves its reputation as a chocolate lover's dream. By combining multiple forms of chocolate, you get incredible flavor depth, while the straightforward preparation works for bakers of all skill levels. What makes it special is how it transforms basic ingredients into something extraordinary without needing fancy skills or unusual tools. Unlike desserts that sacrifice taste for simplicity or require complex techniques, this cake strikes the perfect balance—delivering an unforgettable chocolate experience that anyone with a serious chocolate craving can successfully create.
Frequently Asked Questions
- → What’s a good coffee substitute for this cake?
- Swap coffee with hot milk or water. Coffee just boosts the chocolatey flavor, so skipping it won’t mess up the cake.
- → Best way to store leftovers?
- Keep uneaten cake in an airtight container at room temperature for up to 3 days. Or refrigerate for about a week. Warm slices in the microwave before eating!
- → Does freezing work for this cake?
- Absolutely. Wrap the whole cake or slices in plastic wrap and foil, then freeze for up to 3 months. Let it thaw in the fridge before warming up slices.
- → What pan works if I don’t have a bundt pan?
- Use a 9x13 pan or two 9-inch round pans instead. Adjust the bake time to around 30-35 minutes.
- → Why did my bundt cake stick to the pan?
- Grease the pan well with butter or shortening, then coat it with cocoa powder instead of flour. Let the cake cool for exactly 10 minutes before removing–too soon or too late can cause headaches!