
 Pin it
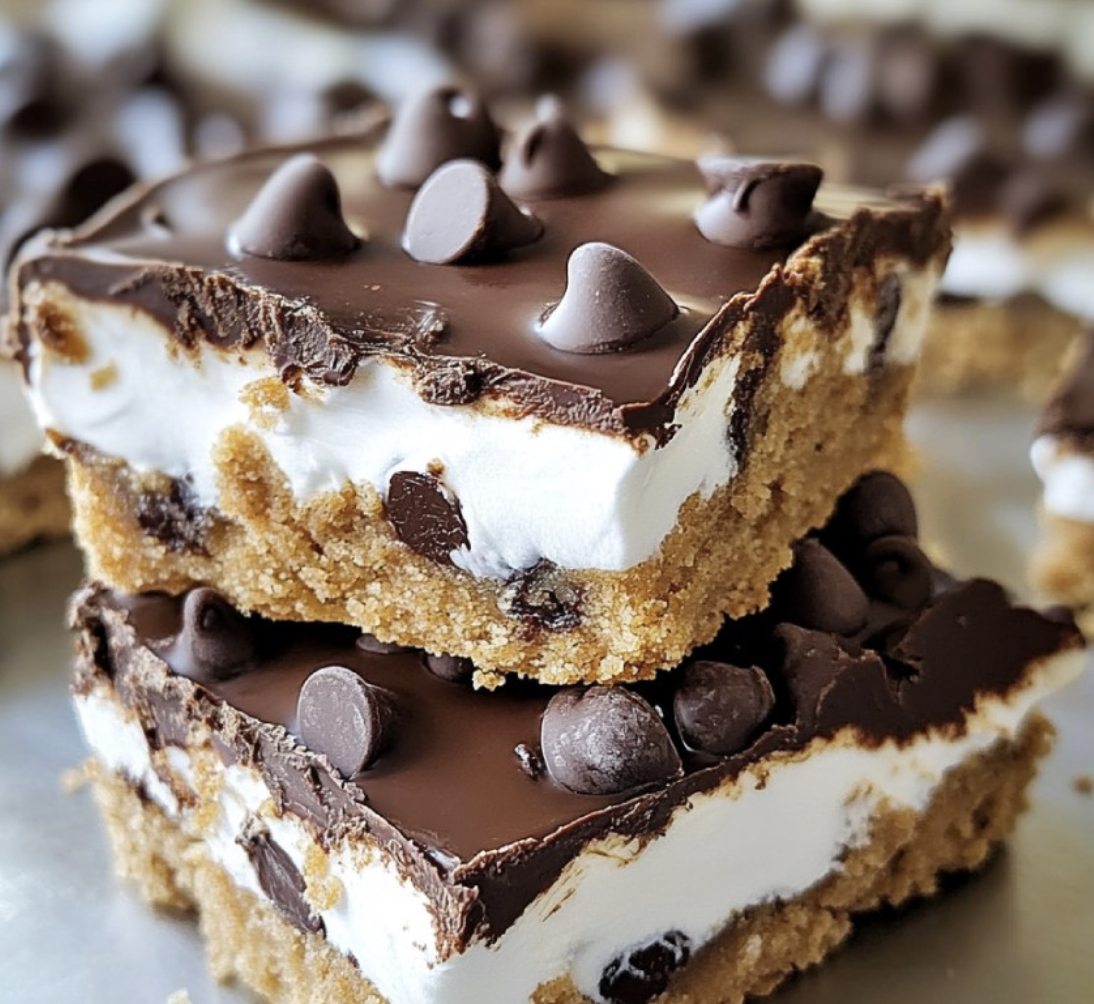
Triple-layer Cookie Marshmallow Bars take your regular sweet snack to a whole new level. They combine a soft chocolate chip cookie bottom, fluffy marshmallow middle, and smooth chocolate layer on top for an amazing mix of tastes and textures. It's like enjoying s'mores without needing a campfire. They're perfect for family get-togethers, shared meals, or just treating yourself at home after a long day.
When I baked these for my sister's birthday party, they were gone in moments. My niece wondered if I'd gotten them from a fancy bakery - that made my day!
Ingredients:
- Unsalted butter (1 cup, softened): This creates the rich base for our cookie layer. Make sure it's soft but not melty for the best results.
- Brown sugar (1 cup, packed): Gives moisture and a hint of caramel flavor that you can't get from white sugar alone. Either light or dark works great.
- Granulated sugar (1/2 cup): Adds the right amount of sweetness and helps create the perfect cookie texture.
- Large eggs (2): These hold everything together. Let them sit at room temp for easier mixing.
- Vanilla extract (2 teaspoons): Makes all other flavors taste better. Go for real vanilla instead of the fake stuff.
- All-purpose flour (2 1/2 cups): The main building block of our cookie base. Scoop into your measuring cups and level off for the right amount.
- Baking soda (1 teaspoon): Gives just enough rise for chewy cookies instead of cakey ones.
- Salt (1/2 teaspoon): Cuts the sweetness and brings out all the flavors. Don't leave it out!
- Chocolate chips (1 1/2 cups): Creates yummy pockets of melted chocolate throughout. Semi-sweet gives the best flavor balance.
- Marshmallow creme (2 cups): Makes our soft middle layer. Better than using whole marshmallows which can leave gaps.
- Semi-sweet chocolate chips for topping (2 cups): Creates our shiny top layer. Semi-sweet isn't as overly sweet as milk chocolate would be.
- Coconut oil or butter (2 tablespoons): Helps the top chocolate layer stay smooth and keeps it from cracking when you cut it.
Simple Cooking Steps:
- 1. Get Ready
- Put your oven rack in the middle and heat it to 350°F (175°C). Grease your 9x13-inch pan thoroughly. I like to spray it lightly with cooking spray then line it with parchment paper that hangs over the long sides for easy lifting later.
- 2. Mix Cookie Dough Base
- Using your mixer with the paddle attachment (or hand mixer), beat the soft butter for about half a minute until it's smooth. Throw in both sugars and mix for 2-3 minutes until everything looks lighter. Don't rush this part – it puts air into your dough for better texture.
- 3. Add Wet Stuff
- Put in one egg at a time, mixing for 30 seconds after each one. Scrape down the bowl sides with a spatula so everything mixes evenly. Add the vanilla and blend just until it's mixed in. Don't overdo it.
- 4. Mix In Dry Ingredients
- In another bowl, stir together the flour, baking soda, and salt. Add this to your wet mixture in three batches, mixing on low just until each batch disappears. The dough should look a little undercooked to keep the cookies from getting tough.
- 5. Finish and Bake Base
- Fold in the chocolate chips with a spatula until they're spread throughout. Press the dough into your pan, making it level all the way to the edges. Wet your hands slightly or use a measuring cup to keep it from sticking. Bake for 20-25 minutes until the edges turn golden and the middle looks set but still a bit soft.
- 6. Let It Cool
- Let the cookie base cool completely in the pan on a wire rack. This takes at least 1-2 hours. You've got to be patient – if you try to add marshmallow to a warm base, it'll turn into a gooey mess instead of nice layers.
- 7. Add Marshmallow Middle
- Once it's cooled, spread the marshmallow creme evenly across the whole cookie base. Spray your spatula with a bit of cooking spray to keep it from sticking. Work from the middle outward with gentle motions so you don't pull up cookie crumbs.
- 8. Make Chocolate Topping
- Put chocolate chips and coconut oil in a microwave-safe bowl. Heat in 30-second bursts, stirring well between each one even if the chips don't look melted yet. This stops the chocolate from burning. Keep going until it's totally smooth.
- 9. Put It All Together
- Pour the warm, melted chocolate over the marshmallow layer. Tilt the pan gently to help it reach all the edges, then use a spatula to make it perfectly smooth. Tap the pan on the counter a few times to get rid of air bubbles.
- 10. Let It Set and Cut
- Let everything set completely before cutting. For clean cuts, chill in the fridge for at least an hour, then use a sharp knife that you've run under hot water and dried between cuts. For the prettiest bars, trim the edges before cutting into 12 even squares.
My grandma always told me a bit of butter makes everything taste better, and these bars prove she was right. When I use fancy European butter with extra fat content, the cookie base tastes almost like shortbread. Even my husband, who's super picky, can't resist them. He says the marshmallow part reminds him of the fluffernutter sandwiches he ate as a kid, but fancier.
Keeping Them Fresh
These Cookie Marshmallow Bars stay yummy for up to 5 days when stored right. Put them between sheets of parchment paper in a sealed container so they don't stick together. Keep them on the counter if your home is cool, or in the fridge during hot weather. I've noticed the flavors actually get better after the first day, so they're great to make before parties or special events. If you need to keep them longer, they freeze well for up to 3 months – just let them thaw in the fridge overnight before eating.
Ways To Customize
You can easily change these cookie bars to match the season or your own tastes. Try using white chocolate chips instead of semi-sweet in the cookie base and add dried cranberries for a holiday twist. For extra crunch, mix in 1/2 cup of toasted chopped pecans or walnuts. My favorite change is adding a teaspoon of espresso powder to the cookie dough, which makes the chocolate taste even better without tasting like coffee. These bars are super forgiving – you can add almost anything as long as you don't mess up the balance between wet and dry ingredients.
Ways To Wow Your Guests
These bars taste amazing by themselves, but you can dress them up for special times. Try warming a square for 10-15 seconds in the microwave and putting a small scoop of vanilla ice cream on top for an awesome mix of hot and cold. For dinner parties, cut them into tiny bites and arrange them on a plate with fresh berries and mint leaves to look fancy. During holidays, I like to drizzle a little caramel sauce on top with a sprinkle of sea salt flakes right before serving. This turns them into a fancy dessert worth bringing out your best dishes and candles.
Frequently Asked Questions
- → What can I swap for marshmallow creme?
You can replace marshmallow creme with 3 cups of mini marshmallows. Spread them on the cookie layer, bake for 2-3 minutes (they'll puff up but shouldn't brown), then smooth them out with a greased spatula before adding the chocolate topping.
- → How should I keep these fresh?
Store them in an airtight container. They'll keep for 2-3 days at room temperature, up to a week in the fridge, or 3 months frozen. Use parchment paper between stacked layers to avoid sticking. Let them thaw completely before serving if frozen.
- → Can I make them in advance?
Sure! These bars taste even better after resting for a day or two in an airtight container. Their flavor blends beautifully, making them a perfect make-ahead option.
- → How do I slice them without a mess?
Chill the bars until the chocolate topping is firm. Use a warm, sharp knife (dip it in hot water and wipe it clean between cuts). A plastic knife also works surprisingly well for avoiding sticky marshmallow messes.
- → Can I add extra ingredients to the base?
Absolutely! Mix 1/2 cup of chopped nuts, crushed pretzels, or toffee bits into the cookie base for a new twist. Just don't exceed 1 cup total so the crust holds together properly.
- → What's a good alternative for coconut oil in the topping?
No coconut oil? No problem. Use butter, shortening, or vegetable oil instead, in the same amount. Butter makes a softer topping, while shortening gives you a firmer one.