
 Pin it
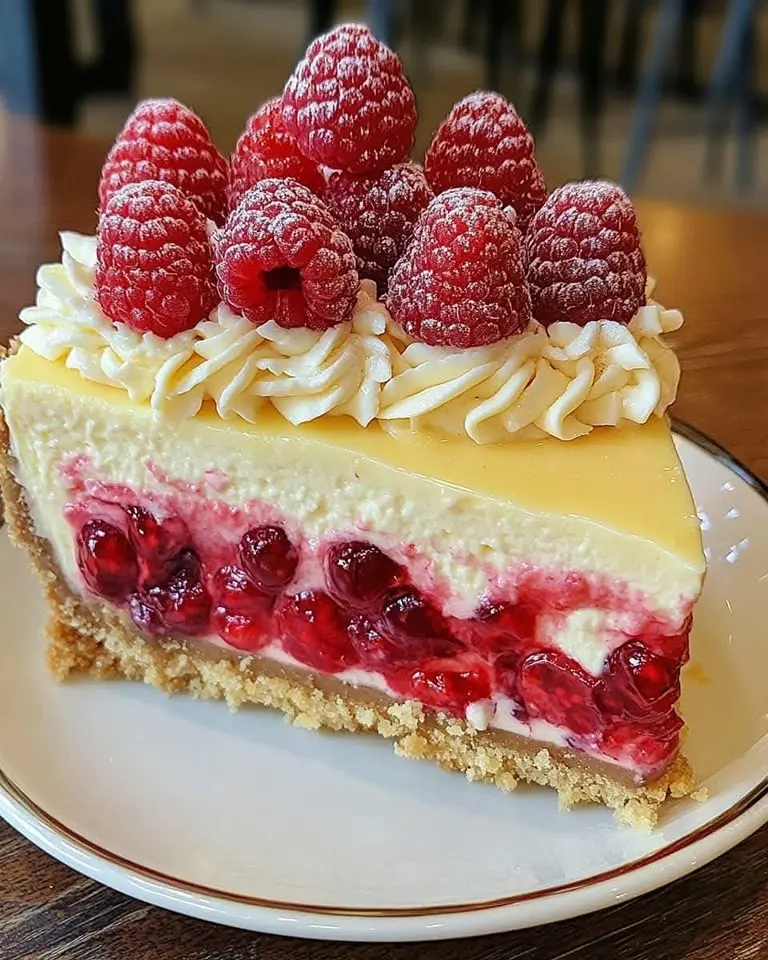
This creamy Raspberry White Chocolate Cheesecake blends the mild sweetness of white chocolate with tangy fresh raspberries. The smooth, rich filling rests on a crunchy graham cracker base, striking a wonderful balance in both taste and texture. What makes this dessert stand out is how the fresh raspberries swirl through the filling, with a homemade berry sauce drizzled on top that looks stunning and adds an extra pop of flavor.
I whipped up this cheesecake for my sister's birthday several years ago, and now everybody in my family asks for it. The white chocolate gives it this amazing creamy richness without going overboard on sweetness, and the raspberries cut right through all that richness just right.
Ingredients:
- For the Crust:
- Graham cracker crumbs (1½ cups): Makes a solid yet tender bottom layer; buy pre-crushed or blitz whole crackers in your blender
- Granulated sugar (¼ cup): Brings sweetness and helps the crust stick together; stick with plain white sugar here
- Unsalted butter, melted (½ cup): Works as the binding agent for your crust; using unsalted lets you manage the salt level
- For the Cheesecake Filling:
- Cream cheese (16 ounces): The foundation of any good cheesecake; let full-fat blocks sit out until soft to avoid lumps
- Granulated sugar (1 cup): Counters the cream cheese tang; you can use ¾ cup if you want it less sweet
- Vanilla extract (1 teaspoon): Boosts all the other tastes; go for real vanilla instead of the fake stuff
- Large eggs (3): Gives the cake its body and richness; warm them up before using
- White chocolate chips, melted (1 cup): Adds smooth sweetness and firms up the filling; pick good ones that melt without clumping
- Fresh raspberries (1 cup): Brings color and tartness; pick bright, firm berries with no mushy spots
- For the Raspberry Sauce:
- Fresh raspberries (1 cup): Makes a bright, zingy topping; you can use thawed frozen ones in a pinch
- Granulated sugar (¼ cup): Takes the edge off the berries' sourness
- Lemon juice (1 tablespoon): Perks up the flavor and keeps the sauce looking vibrant
Step-by-Step Instructions:
- Prepare the Crust:
- Heat your oven to 325°F (160°C). Coat the inside of a 9-inch springform pan with butter or cooking spray. If your pan sometimes leaks, wrap the outside with foil to keep butter from dripping in your oven. We're using a lower temp than normal cakes because cheesecakes need slow, steady heat.
- Mix and Bake the Crust:
- Grab a medium bowl and stir together the graham crumbs and sugar with a fork to mix them up well. Pour the melted butter in and stir until everything looks like damp sand. When you squeeze some in your hand, it should stick together. Push the mix firmly into the bottom of your pan using a measuring cup's flat bottom, making a level layer with slightly raised edges. Bake it for 8-10 minutes until it smells good and the edges start to darken. Take it out and let it cool completely on a rack while you make the filling.
- Prepare the Filling:
- In a big bowl, put your room-temp cream cheese (this part is super important) and sugar. Beat with an electric mixer on medium for 3-4 minutes until everything's fluffy, smooth, and lump-free. Stop now and then to scrape the bowl with a rubber spatula. Add the vanilla and mix just enough to blend it in without going overboard.
- Add Eggs and Chocolate:
- Turn your mixer down low. Drop in eggs one by one, mixing about 20 seconds after each before adding the next. Don't overmix - that puts too much air in and can make cracks later. Pour in your melted white chocolate (make sure it's cool but still runny) and mix on low until everything's the same color and looks silky. Your batter should look perfectly smooth now.
- Fold in Raspberries:
- With a rubber spatula, gently swirl the fresh raspberries into the mix using figure-eight motions. Don't stir too much - about 5-6 gentle folds will spread them out while keeping most berries whole. Some will naturally break and make pretty pink streaks through the batter, which looks great.
- Bake the Cheesecake:
- Pour your filling over the cooled crust and smooth the top with your spatula. Tap the pan gently on the counter a few times to pop any air bubbles. Put it on the middle rack of your hot oven and bake for 55-60 minutes. You'll know it's done when the edges don't jiggle but the middle still wobbles slightly - about a 2-3 inch wobbly spot in the center when you gently shake the pan. Keep the oven door shut for the first 45 minutes of baking to avoid temperature drops that cause cracks.
- Cooling Process:
- When it's finished baking, turn off the oven but leave the door closed and keep the cheesecake inside for a whole hour. This slow cooling stops the quick temperature change that often cracks the top. After an hour, open the oven door halfway and let it cool another 30 minutes right there. Then take it out and let it finish cooling on a rack for about 2 hours until it reaches room temperature. Once it's completely cool, cover it with plastic wrap and stick it in the fridge for at least 4 hours, but overnight works even better. The flavors will get friendlier during this time.
- Prepare the Raspberry Sauce:
- Mix the fresh raspberries, sugar, and lemon juice in a small pot. Cook over medium heat, stirring now and then with a wooden spoon. As they warm up, gently mash some berries against the side of the pot. Cook for 5-7 minutes until the sauce gets a bit thicker and coats the back of a spoon. Turn off the heat and let it cool all the way. If you want it smooth, push it through a fine strainer to get rid of seeds (if you want). Put it in a container and chill it until serving time.
- Serve the Cheesecake:
- When you're ready to eat, slide a thin knife around the edge of the springform pan before opening the clasp. This stops the cake from sticking and cracking. Move it to a serving plate, cut it with a sharp knife (wiping the blade between slices for neat cuts), and spoon some raspberry sauce over each piece right before serving. For super clean slices, dip your knife in hot water and wipe it dry between cuts.
My grandma always called raspberries 'nature's little gems,' and they truly sparkle in this dessert. When my kids were little, they'd help me pick raspberries from our garden just for this cheesecake. The tiny ones that didn't make it to the basket usually ended up in their mouths, but we always had plenty left for our family's favorite sweet treat.
Creamy Texture Tips
Getting that dreamy smooth texture happens when you mix things right and watch your temperatures. Always let your cream cheese warm up for at least 2 hours before you start. Your eggs should be room temperature too so they mix in without making lumps. While mixing, keep scraping down the bowl, and once the eggs go in, mix just until they disappear. Too much mixing puts air bubbles in your batter, which can crack the top and make the cheesecake less dense and creamy.
Tasty Twist Ideas
You can switch up this cheesecake recipe in so many ways to match what you like or what's in season. For a chocolate-raspberry version, add 2 tablespoons of cocoa to the crust and throw in 1/2 cup of semi-sweet chocolate chips to the batter. In summer, swap the raspberries for strawberries or blueberries—or mix all three for a berry bonanza. For a fancier flavor, splash in 2 tablespoons of amaretto to the filling and add a teaspoon of almond extract to the crust for a nutty hint that goes great with both the white chocolate and berries.
Prep-Ahead and Storage Ideas
This cheesecake is perfect for parties because it actually tastes better the next day. The flavors get deeper and richer after 24 hours in the fridge, so day-old cheesecake beats fresh-baked hands down. To keep it good, cover it and store in the fridge up to 5 days. If you need to make it way ahead, it freezes great for up to two months. To freeze it, let it cool completely, then chill in the fridge for at least 4 hours. Take it out of the springform pan, wrap it tight in plastic, then in foil, and pop it in the freezer. Thaw overnight in the fridge before serving. I'd make the raspberry sauce fresh rather than freezing it, since frozen sauce can get watery and lose its bright color.
Frequently Asked Questions
- → Can I use frozen raspberries in this recipe?
Absolutely, frozen ones will work. Thaw and drain the raspberries for the filling to prevent extra liquid. For the glaze, cook them a bit longer until it thickens properly.
- → How do I keep my cake from cracking?
Don’t over-whip the batter to avoid air bubbles. Bake it in a water bath to help it cook evenly, and after baking, let it cool gradually in the oven before chilling.
- → Can I freeze this cake?
Sure, this freezes well. Cool it completely, wrap tightly in plastic and foil, then store for up to 2 months. Thaw overnight in the fridge and make the berry glaze fresh before serving.
- → How should I melt white chocolate?
Heat it gently for best results. Use a double boiler (a heat-safe bowl over simmering water) or microwave in short bursts, stirring often to avoid burning. Stop when it’s nearly melted, stirring to finish.
- → How do I know the cake’s done baking?
The edges should be set while the middle jiggles a bit when you shake it gently. It’ll firm up as it cools. For accuracy, use a thermometer to check the center—150°F (65°C) is perfect.
- → Can I bake this without a springform pan?
If you don’t have one, use a regular round pan or pie dish lined with parchment paper that overlaps the edges, making it easier to lift the cake out after chilling.