
 Pin it
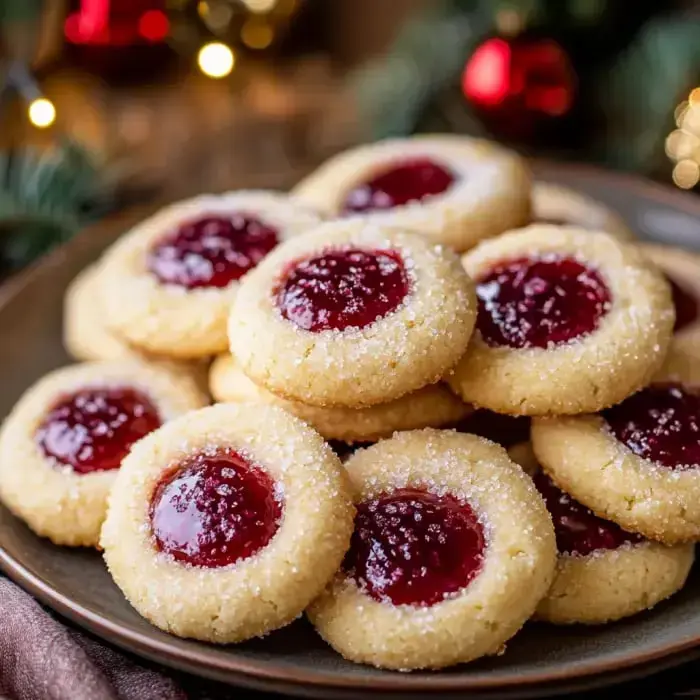
I always think of happy times when I bake these Christmas thumbprints. Every December I pop them in the oven—the outside is crunchy, the inside is oh-so-soft, and they just melt away when you take a bite. No pesky chill time, they’re ready in a snap and keep tasting amazing for days. I toss them into gift baskets or cookie tins, and folks get excited the minute they spot them.
Why You'll Want These Cookies
What’s awesome about these cookies is you’ve got options—switch up the flavors and toppings any way you want. Raspberry, chocolate, peppermint, lemon—whatever you crave. When things get crazy busy during the holidays, I know I can count on these. They bake up sturdy enough for gifting, but the middle stays soft and dreamy. Bet these will turn into your go-to holiday favorite too.
What To Grab
- Cocoa Powder: Got a chocolate craving? Toss some in for a kick.
- Toppings: Use sprinkles or go for nuts, coconut, or broken-up candies—whatever makes you smile.
- Baking Powder: The not-so-secret trick that gives a soft bite.
- Flour: All-purpose does the trick and keeps the cookies together.
- Butter: The star for that rich, melt-in-the-mouth feel.
- Egg and Vanilla: Pulls it all together so the flavor really sings.
- Fillings: Get creative—maybe Nutella, jam, or lemon curd, follow your mood.
- Brown and Granulated Sugar: Mixing both types makes the cookies taste just right and gives a killer texture.
How To Whip Them Up
- Final Steps
- Give them a chance to cool off, then pile on any last toppings you’re in the mood for. Try not to munch them all right away.
- Fill and Bake
- Spoon jam or whichever filling you love into the middles, but if you want Nutella, add it later. Bake your cookies at 355°F for 8 to 10 minutes.
- Roll and Shape
- Roll dough into little balls, dunk them in sugar or fun toppings, then use your thumb to make the classic dip in the center.
- Mix It Up
- Beat the butter, sugars, and vanilla together so it’s nice and light. Add your egg, stir in flour then baking powder. Split the dough and mix in cocoa powder if you’re going chocolatey.
My Top Cookie Tricks
Want thumbprints that turn out just right? Don’t mix the dough too much—soft is the goal. Take them out of the oven with centers that look a tiny bit underbaked—they’ll firm up as they set. Rolling in sugar first keeps dough from being too sticky, and if you’re adding chocolate on top, wait until they’re done baking.
Staying Fresh Is Easy
These cookies are still awesome for days if you keep them in a sealed container in the fridge, up to 4. Want to save some for later? Freeze them for months—they’ll be fine for about 2. Raw dough doesn’t love the fridge, so just make the cookies first so the dough won’t get tough or crumbly for shaping.
Christmas Cookie Glow-Up
The magic here is you’ll end up with a whole pile of different cookies from just one batch of dough. Fill your holiday tin with all kinds of varieties, or set out a show-stopping tray for guests. Since you don’t have to wait for chilling, you’ll have fresh cookies any time your sweet tooth hits. The perfect mix of a crisp bite and a soft, pillowy middle keeps folks grabbing for more.
Change Up Your Flavor Game
Try combos like chocolate-peppermint or add bright lemon curd for a pop of flavor. Crushed-up candy canes, coconut, or bright sprinkles dress up the tops for any holiday vibe. My crew goes nuts for Nutella or cookie butter, but you can’t go wrong with the classic raspberry jam.
Tasty Pairings
These are perfect for a holiday dessert tray, especially next to a cozy mug of cocoa or some zippy mulled wine. Mix them with homemade shortbread and spicy gingerbread for the ultimate snack spread. Tie up a box with ribbon and you’ve got the cutest edible present.
Finishing Up
Space your cookies a couple inches apart on the pan so they’ve got room to spread. Scoop out dough balls all the same size for even cooking. Always preheat the oven and lay down parchment for easy pan cleaning. Don’t be afraid to try out new toppings for a little extra flair.
 Pin it
Frequently Asked Questions
- → Why is it tricky to make the dough ahead?
- Chilled dough turns stiff, so sugar won't stick, cookies crack, and the texture isn't as soft. Make and bake on the same day for the best results.
- → When do I add different fillings?
- Put jams or curds in before baking. While still warm from the oven, add chocolates, Hershey’s Kisses, or Nutella for a perfect finish.
- → How long do these cookies stay fresh?
- Keep them in a sealed container in the fridge for up to 4 days. Timing might vary depending on the filling you choose.
- → Can I make an all-chocolate version?
- Absolutely, mix cocoa into the dough to make the entire batch chocolate. Or, split the dough to have half vanilla and half chocolate.
- → Why roll the cookies before pressing them?
- Coating them in sugar or toppings prevents the dough from sticking when you press down to create the thumbprint.