
 Pin it
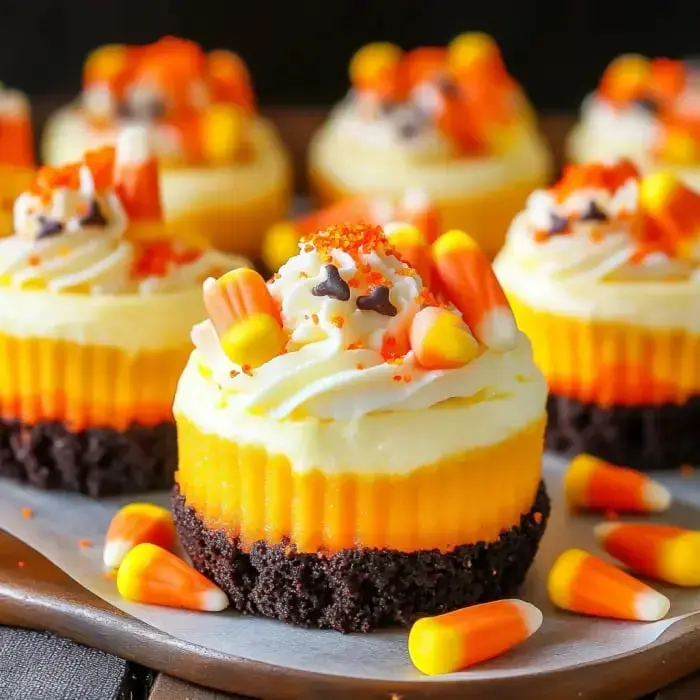
Little Candy Corn Cheesecakes bring a pop of color and fun to any Halloween shindig! Each vibrant bite has cute layers of white, orange, and yellow that look just like candy corn, so they’re a treat for both your eyes and your taste buds. The creamy middle sits on a crunchy Oreo base, and you pile on some fluffy whipped cream to finish it all off. Kids and adults will have a blast making and eating these at parties or family nights. Time to check out what makes these spooky bites a crowd-favorite!
INGREDIENTS
- Ghost toppers (optional): Toss these on if you want to give your cheesecakes a Halloween look.
- Yellow and orange gel icing colors: These brighten up the filling so you get that classic candy corn vibe.
- 1 1/2 tsp vanilla extract: Adds a little background sweetness that helps everything taste better.
- 12 ounces (339g) cream cheese (room temperature): This is the heart of your filling, making every bite soft and smooth.
- 2 tbsp (41g) butter (melted): Mixes with the crumbs and keeps the base together.
- 2 tbsp (16g) all-purpose flour: Gives the filling a bit of hold without making it heavy.
- 5 tbsp (36g) powdered sugar: Makes the whipped cream sweet and perfect for topping.
- 1/2 cup (104g) sugar: Gives a sweet counter to the tangy filling.
- 1/2 cup (115g) sour cream: Puts some tang and extra creaminess into your cheesecake layer.
- 1/2 cup (120ml) heavy whipping cream (cold): Whip this up for that cloud-like topping.
- 2 large eggs: Hold your whole filling together and keep it from falling apart.
- 1 1/2 cups (201g) Oreo crumbs: Use these for a chocolaty, crunchy bottom to build on.
INSTRUCTIONS
- Step 10:
- Just crack the oven a bit and let them hang out there for about 15-20 minutes, then move to the fridge so they can get cold all the way through.
- Step 9:
- Pop the cheesecakes in the oven for 15 minutes. Turn the oven off but let them sit inside (door closed) for another ten so they don’t split.
- Step 8:
- Spoon in those layers! Start with yellow batter at the bottom, orange in the middle, then top it off with the plain for that candy corn look. Fill each cup up good.
- Step 7:
- Split your filling into three bowls. Make one yellow, one orange, and keep one without color. This is how you get the fun stripes.
- Step 6:
- Gently add the eggs one by one, mixing until each is just blended in. Scrape the bowl down so everything blends.
- Step 5:
- Pour in your sour cream and vanilla. Keep mixing on low till it all comes together nicely.
- Step 4:
- Lower the oven heat to 300°F (148°C). Mix the flour, cream cheese, and sugar in a big bowl using low speed. Don’t go crazy mixing—too much air means cracks!
- Step 3:
- Bake crusts just 5 minutes. Pull out and let them chill while you work on the filling.
- Step 2:
- Mix up Oreo crumbs and melted butter in a small bowl, then split the mix into cupcake liners (about 2 tablespoons per). Press down to make a solid crust.
- Step 1:
- Heat up your oven to 325°F (162°C). Pop cupcake liners in a pan and lightly spray them so your cheesecakes don’t get stuck.
Serving and Storage Tips
- Pop these cheesecakes out of the fridge and serve them cold with a pile of whipped cream and some ghost toppers if you want that extra Halloween vibe.
- They hit the spot at spooky get-togethers, but honestly, they also make a super fun dessert for your family on any chilly night.
- Chuck leftovers into a sealed container and slide it in the fridge—they’ll stay tasty for 2-3 days easy.
- If you wanna get ahead, bake the cheesecakes the day before you need them, then add whipped cream right before you hand them out.
Tips from Well-Known Chefs
- Chef Christina Tosi uses a few drops of almond extract in her whipped cream to bump up the flavor.
- Chef Duff Goldman likes tossing a sprinkle of cinnamon in the Oreo crust for a cozy hint of spice.
VARIATIONS
- Need gluten-free? Just grab gluten-free Oreos and double-check the rest of your ingredients.
- You don’t have to use the colors—keep it simple with the plain filling and a dollop of whipped cream on top for something classic.
- You can jazz them up with extra candy corn, some sparkly sprinkles, or even a little edible glitter if you’re feeling wild.